No ride today. It was raining hounds and kibblers out there. If you watched any of the ATT Pebble Beach on TV, you know what I was up against. Instead of a ride, I threw down a long set of stretching exercises for my back.
I need the work, but hopefully conditions will improve tomorrow. I'm now doubly glad that I forced myself out the door on Thursday.
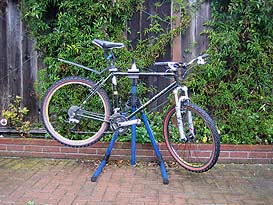
Speaking of conditions, I go through a nine-step maintenance checklist before every ride to keep my wheeled steeds in optimal condition. I don't get bogged down in whether the bike looks good or not, but instead focus on working parts like the drive train and the suspension.
IMHO (yes, I just IMHO'ed, but it was a wickedly derisive IMHO, not a geek-chic SMS IMHO), prepping your bike before each ride is like getting your car's oil changed every 3,000 miles: it's the most critical single thing you can do to extend the life of your parts. Sure, it adds a few minutes to your prep time, but it's worth it.
To Prep Your Bike Before a Ride
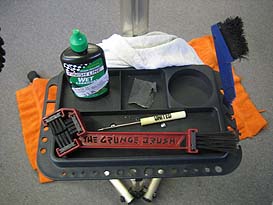
Required tools: one chain brush, one rag, chain lube, a floor pump, one small flathead screwdriver (optional), sandpaper (optional).
1. (Optional) Wipe down the breaking surfaces of your rims.
If you have V-brakes, use your rag to wipe down the flat surfaces of each rim where they are contacted by the brake pads. Be sure to go all the way around each side of each wheel. Don't worry about the rest of the wheel, just the braking surfaces. Keep the braking surfaces clean to prevent dirt from scoring your rims, to improve braking performance, and to keep your brakes from shrieking.
 |
 |
All the tools you need |
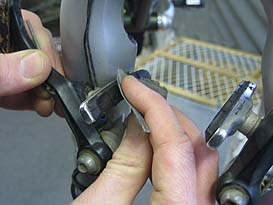
1-a. Lightly sand the pads |
1-a. (Optional) Sand your brake pads.
Also for youze that still run V-brakes, use a small piece of sandpaper to sand the burrs, imperfections, and small pieces of rock out of your brake pads. A few light strokes should be enough -- don't sand down your whole pad! Smooth brake pads improve braking performance and reduce rim scoring.
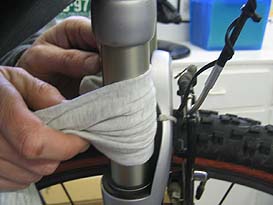
2. Clean the front fork stanchions.
Use your rag to clean both front fork stanchions. Use a back-and-forth sawing motion to get hard-to-reach spots. Be careful not to force dirt down into the dust seals. Cleaning the stanchions helps prevent scoring and keeps dirt from getting inside the fork body.
 |
 |
2. Back and forth |
3. Wipey-wipe |
3. Clean the chain.
Using the chain brush and your rag, clean the chain. Use short, vigorous strokes with the brush to knock off any clinging remnants of the trail or your previous application of lube. Wipe clean with the rag. The chain is the most important part of the drive train -- keep it clean to reduce the rate of wear on the rest of the drive train.
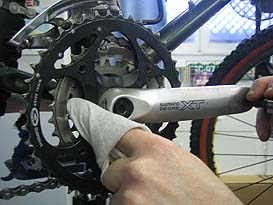
4. Wipe off the chain rings.
With the rag, clean the lube, dirt, and gunk off each of the chain rings. As best you can, make sure that each tooth is clean. This is a task that could take an hour by itself, so you're really not trying to get it spotless. Just get what you can reach with the rag, which should be 95 percent of the rings. Clean rings last longer, which saves you money.
 |
 |
4. Brush your teeth |
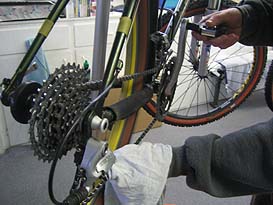
5. Pinch me |
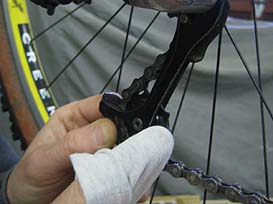
5. Clean the rear derailler pulleys.
These two little bad boys often get overlooked, but they get filled up with mud and excess lube after just one ride. Take a rag between your fingers, pinch the pulley, and spin the pedals around a couple of times and that should do it. Yes, the lower pulley is harder to get completely clean, but it can be done. The upper pulley will have the most gunk on it, consider using a small flathead screwdriver blade to peel the gunk off the pulley. Keep your pulleys clean for smoother shifting.
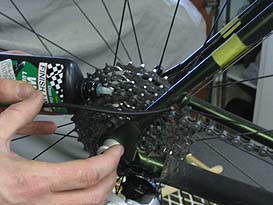
6. Lube the chain.
Depending on riding conditions, apply a dry or wet lube to every link in the chain and allow it to soak in while you finish the other tasks on this list. Lube the chain to keep it supple and to reduce friction on your other parts.
 |
 |
6. Get oiled up |
7. Forth and back |
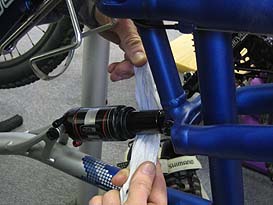
7. (Optional) Clean the rear suspension stanchion.
If you have a full-suspension bike, use the rag to clean the exposed part of the rear suspension component, using the same techniques and following the same precautions as with the front suspension.
Cleaning the stanchion helps prevent scoring and keeps dirt from getting inside the suspension element.
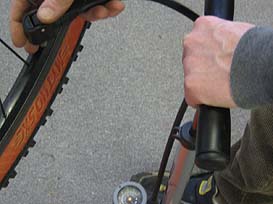
8. Check the tire pressure.
Again, depending on riding conditions, you're going to want different psi in your tires. Lower psi for wet and technical conditions, higher psi for pavement or hardpack. If you haven't ridden in more than a week, definitely check your tires -- they all leak slowly over time. Properly inflated tires help improve the performance and handling of the bike.
 |
 |
8. Pump it |
All done |
9. Wipe off the chain.
Remove excess lube from the chain with the rag. Though it may make you feel better, your entire chain does not need to be coated in lube. Only the pivots, the two little rivets in each chain link, need to stay lubed. Clean off the excess lube to prevent it from picking up a layer of dirt and grit.
That's it. You're good to go, and you're bike is going to perform better for longer -- this checklist is Viagra for your bike (not that I would know anything about that).
Also check out Cannonball's Tech Tip -- #1: Power Tools.
|

